SSM - Spring
本文最后更新于:6 个月前
SSM框架 - Spring
Spring
Spring技术是JavaEE开发必备技能,企业开发技术选型命中率>90%
- 简化开发,降低企业级开发的复杂性
- 框架整合,高效整合其他技术,提高企业级应用开发与运行效率
简化开发
IoC
AoP
(事务处理 )
框架整合
MyBatis
……
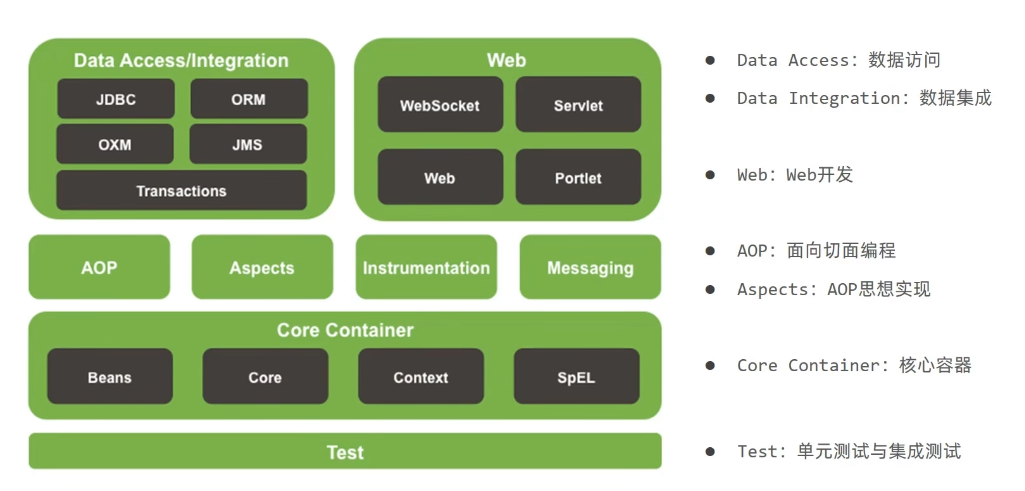
Spring Framework系统架构
IoC 控制反转
- Inversion of Control 控制反转
对象的创建控制权由程序转移到外部,这种思想称之为控制反转
使用对象时,由主动new产生对象转换为由外部提供对象
- IoC容器
IoC容器,充当IoC思想中的—外部
- Bean
IoC容器负责对象的创建,初始化等一系列工作,被创建或者被管理的对象在IoC容器中统称为—Bean
DI 依赖注入
- Dependency Injection 依赖注入
在容器中建立bean与bean之间的依赖关系的整个过程,称之为依赖注入
最终效果
使用对象时,不仅可以直接从IoC容器中获取,并且获取到的bean已经绑定了所有的依赖关系
IoC入门案例
1、导入Spring坐标
pom.xml
<dependency>
    <groupId>org.springframework</groupId>
    <artifactId>spring-context</artifactId>
    <version>5.2.10.RELEASE</version>
</dependency>
2、定义Spring管理的类(接口)
两个接口iocdemo1,iocdemo2
仅包含save方法的声明
两个实现类,iocdemo1_1,iocdemo2_1

..........

public class iocdemo1_1 implements iocdemo1 {
    public void save(){
        System.out.println("this is demo1-1");
    }
}

public class iocdemo2_1 implements iocdemo2 {
    iocdemo1_1 demo1 = new iocdemo1_1();
    public void save(){
        System.out.println("this is demo2-1");
        demo1.save();
    }
}
3、在resources中,新建xml配置文件,Spring配置,(applicationContext.xml),配置对应类作为Spring管理的bean
<bean id="demo2" class="com.opn.web.iocdemo2_1"></bean>
4、初始化IoC容器,通过容器获取bean
//效果相同

    iocdemo2_1 demo2 = new iocdemo2_1();
    demo2.save();

    System.out.println("--------------------------");

    //获取IoC容器
    ApplicationContext ctx = new ClassPathXmlApplicationContext("applicationContext.xml");

    //获取资源
    iocdemo2_1 demo2_2 = (iocdemo2_1)ctx.getBean("demo2");

    demo2_2.save();
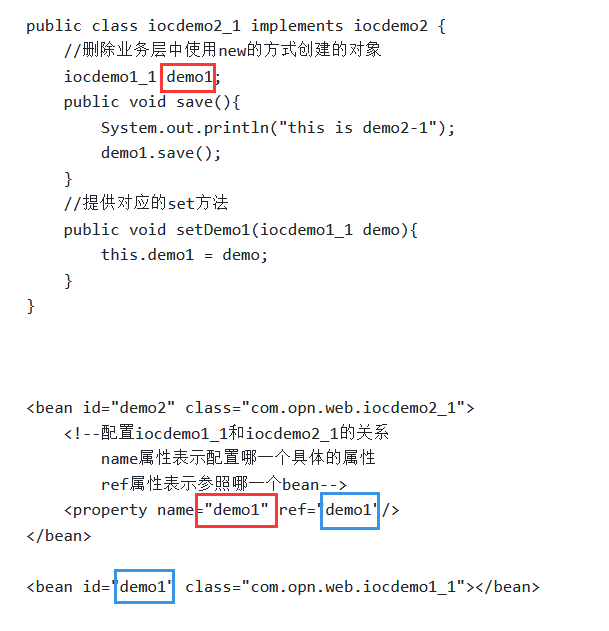
DI入门案例
1、删除业务层中使用new的方式创建的对象
2、提供对应的set方法
3、在配置中构建关系
public class iocdemo2_1 implements iocdemo2 {
    //删除业务层中使用new的方式创建的对象
    iocdemo1_1 demo1;
    public void save(){
        System.out.println("this is demo2-1");
        demo1.save();
    }
    //提供对应的set方法
    public void setDemo1(iocdemo1_1 demo){
        this.demo1 = demo;
    }
}


<bean id="demo2" class="com.opn.web.iocdemo2_1">
    <!--配置iocdemo1_1和iocdemo2_1的关系
        name属性表示配置哪一个具体的属性
        ref属性表示参照哪一个bean-->
    <property name="demo1" ref="demo1"/>
</bean>

<bean id="demo1" class="com.opn.web.iocdemo1_1"></bean>


//获取IoC容器
    ApplicationContext ctx = new ClassPathXmlApplicationContext("applicationContext.xml");

    //获取资源
    iocdemo2_1 demo2_2 = (iocdemo2_1)ctx.getBean("demo2");
    demo2_2.save();
bean
bean基础配置
- 别名
name 可用,;(空格)多个间隔
可用在ref上
<bean id="" name=""class="">
- 单例
多个对象地址相同—一个对象
非单例
地址不同多个对象
//单例(默认)
<bean ... scope="singleton">
//非单例
<bean ... scope="prototype">
- 适合交给容器进行管理的bean
表现层对象
业务层对象
数据层对象
工具对象
- 不适合交给容器进行管理的bean
封装实体的域对象
实例化bean的三种方式
bean实例化 — 构造方法
bean本质是对象,创建bean使用构造方法完成
spring创建bean的时候,调用的是无参数的构造方法
没有无参构造方法报错
<!--方式一:构造方法实例化bean-->

<bean id="user" class="com.opn.web.user"/>
bean实例化 — 静态工厂
静态工厂
不使用new
在factory类中,定义getxxx()方法return new xxx类
实例化时,类 实例名 = 类工厂.get类();
factory类

public class userFactory{
    public static user getuser(){
        return new user();
    }
}

实例化

user user1 = userFactory.getuser();
<!--方式二:使用静态工厂实例化bean
    factory-method,使用工厂的哪个类实例化对象
-->

<bean id="user" class="com.opn.factory.userfactory" factory-method="getuser"/>
bean实例化 — 实例工厂
在factory类中,getxxx()方法 为非静态方法,
创建对象时,需要先将工厂类实例化,再使用getxxx()方法,进行创建
factory类

public class userFactory{
    public user getuser(){
        return new user();
    }
}

实例化

userFactory factory1 = new userFactory();
user user1 = factory1.getuser();
<!--方式三:使用实例工厂实例化bean
    先bean实例工厂
    再bean对象,factory-method工厂方法,factory-bean工厂的bean
-->

<bean id="userfactory" class="com.opn.factory.userfactory"/>

<bean id="userfactory" factory-method="getuser" factory-bean="userfactory"/>
bean实例化 — FactoryBean
创建类FactoryBean
//<T> 泛型 中 填写 需要实例化的类
public class iocdemo2_1FactoryBean implements FactoryBean<iocdemo2_1> {

    @Override
    public iocdemo2_1 getObject() throws Exception {
        //返回需要实例化的类
        return new iocdemo2_1();
    }

    @Override
    public Class<?> getObjectType() {
        //返回需要的类的类型
        return iocdemo2_1.class;
    }

    //改变方法的返回值,改变单例模式
    @Override
    public boolean isSingleton() {
        return FactoryBean.super.isSingleton();
    }

}
配置bean
<!--方式四:使用FactoryBean实例化bean-->

<bean id="iocdemo2_1" class="com.opn.web.iocdemo2_1FactoryBean">
bean生命周期
生命周期:从创建到消亡的完整过程
bean生命周期:bean从创建到销毁的整体过程
bean生命周期控制:在bean创建后到销毁前做一些事情
初始化容器
- 创建对象(内存分配)
- 执行构造方法
- 执行属性执行(set方法,为属性赋值)
- 执行bean初始化方法
bean配置方式
//初始化对应的的操作
public void init()
{}

//销毁前对应的操作
public void destory()
{}


<bean id="" class="" init-method="init" destory-method="destory">
如果需要执行销毁方法,要关闭容器
close()/registerShutdownHook()
关闭容器(父类–ConfigurableApplicationContext)/关闭钩子
接口方式
官方接口 InitializingBean, DisposableBean
public class iocdemo2_1 implements iocdemo , InitializingBean, DisposableBean {

    ......

    //销毁
    @Override
    public void destroy() throws Exception {
    }

    //初始化 --- 属性初始化之后运行
    @Override
    public void afterPropertiesSet() throws Exception {
    }
}
DI注入方式
注入方式—
setter注入
构造器注入/构造方法注入
对象关联的属性—
引用类型
简单类型

setter注入
用set方法为变量赋值
public class booker{
    private book b;
    public setbooker()
    {
        b = new book();
    }
}
- 引用类型
在bean中定义引用类型属性并提供可访问的set方法
配置中使用property标签ref属性注入引用类型对象
<bean id=""    class="">
    //实参b
    <property name="实参名" ref=""/>
</bean>
- 简单类型
在bean中定义简单类型属性并提供可访问的set方法
配置中使用property标签value属性注入简单类型数据
<bean id=""    class="">
    //实参b
    <property name="实参名" value=""/>
</bean>
构造器注入
标准书写
用构造方法为变量赋值
public class booker{
    private book b;
    public booker(book a)
    {
        this.b = a;
    }
}
- 引用类型
在bean中不定义set方法
配置中使用property标签ref属性注入引用类型对象
<bean id=""    class="">
    //形参a
    <constructor-arg name="形参名" ref=""/>
</bean>
- 简单类型
在bean中定义简单类型属性并提供可访问的set方法
配置中使用property标签value属性注入简单类型数据
<bean id=""    class="">
    //形参a
    <constructor-arg name="形参名" value=""/>
</bean>
参数适配
type属性设置形参类型注入
<constructor-arg type="int" value=""/>
index属性设置形参位置注入
<constructor-arg index="0" value=""/>
依赖注入方式选择
强制依赖使用构造器进行,使用setter注入有概率不进行注入导致null对象出现
可选依赖使用setter注入进行,灵活性强
Spring框架倡导使用构造器,第三方框架内部大多数采用构造器注入的形式进行数据初始化,相对严谨
如果有必要可以两者同时使用,使用构造器注入完成强制依赖的注入,使用setter注入完成可选依赖的注入
实际开发过程中还要根据实际情况分析,如果受控对象没有提供setter方法就必须使用构造器注入
自己开发的模块推荐使用setter注入
依赖自动装配
IoC容器根据bean所依赖的资源在容器中自动查找并注入到bean中的过程称之为自动装配
自动装配方法
按类型
提供set方法,bean唯一

autowire="byType"
按名称
提供set方法,bean指定名称

autowire="byName"
特征
自动装配用于引用类型依赖注入,不能对简单类型进行操作
使用按类型装配时( byType )必须保障容器中相同类型的bean唯一,推荐使用
使用按名称装配时 ( byName )必须保障容器中具有指定名称的bean,因变量名与配置耦合,不推荐使用
自动装配优先级低于setter注入与构造器注入,同时出现时自动装配配置失效
集合注入
数组array、列表list、集合set、
<bean id="" class="">
    //(变量名)
    <property name="array/list/set">
        //(数据类型)
        <array/list/set>
            <value>...</value>
        </array/list/set>
    </property>
</bean>
字典map
<bean id="" class="">
    //(变量名)
    <property name="map">
        //(数据类型)
        <map>
            <entry key="" value=""/>
        </map>
    </property>
</bean>
属性文件/配置文件properties
<bean id="" class="">
    //(变量名)
    <property name="properties">
        //(数据类型)
        <props>
            <prop key="">--(value)--</prop>
        </props>
    </property>
</bean>
管理第三方bean — 数据源对象管理
查找其构造、set方法,赋相应值
https://www.bilibili.com/video/BV1Fi4y1S7ix?p=17
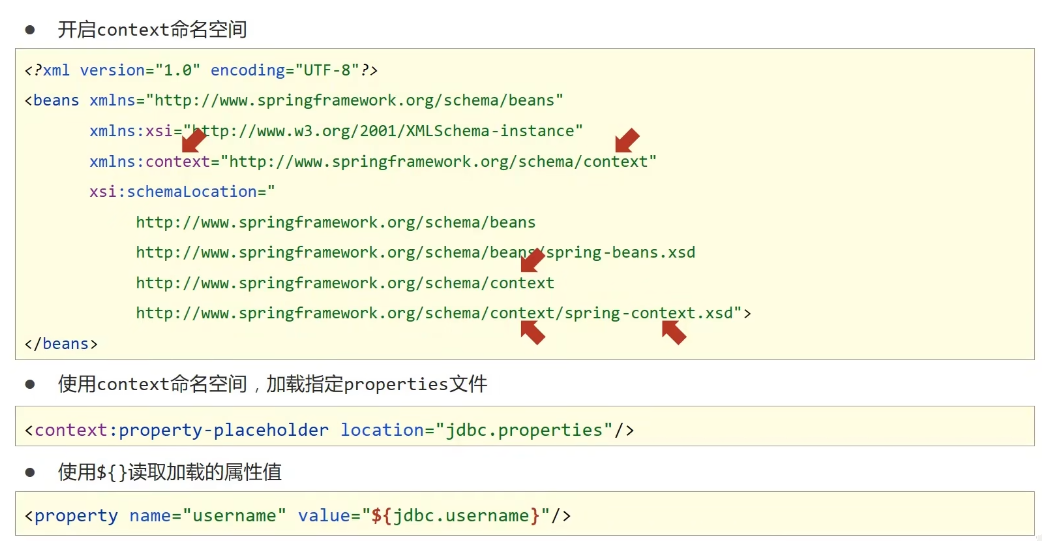
使用Spring加载properties文件
https://www.bilibili.com/video/BV1Fi4y1S7ix?p=18
容器
加载配置文件方式
1、类路径加载配置文件
ApplicationContext ctx = new ClassPathXmlApplicationContext("applicationContext.xml");
2、文件路径加载配置文件
//绝对路径
ApplicationContext ctx2 = new FileSystemXmlApplicationContext("");
3、加载多个配置文件
ApplicationContext ctx = new ClassPathXmlApplicationContext("bean1.xml","bean2.xml");
加载bean的方式
1、使用bean名称获取

User user1 = (User) ctx.getBean("user");

2、使用bean名称获取并指定类型

User user1 = ctx.getBean("user",User.class);

3、使用bean类型获取

//按类型区分,该类型只能存在一个bean
User user1 = ctx.getBean(User.class);
BeanFactory创建容器
过时技术…
BeanFactory创建完毕后,所有的bean均为延迟加载
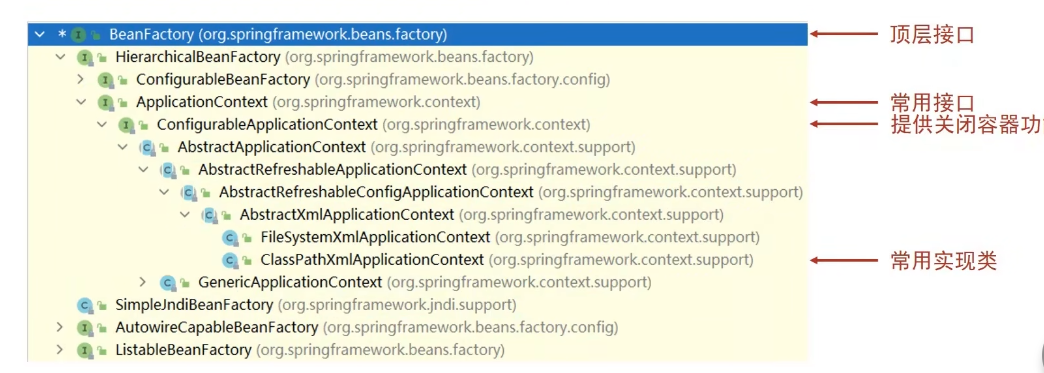
容器类层次结构图
核心容器总结
BeanFactory是IoC容器的顶层接口,初始化BeanFactory对象时,加载的bean延迟加载
ApplicationContext接口是Spring容器的核心接口,初始化时bean立即加载
ApplicationContext接口提供基础的bean操作相关方法,通过其他接口扩展其功能ApplicationContext接口常用初始化类
classPathXmlApplicationContext
FileSystemXmlApplicationContext
bean相关总结
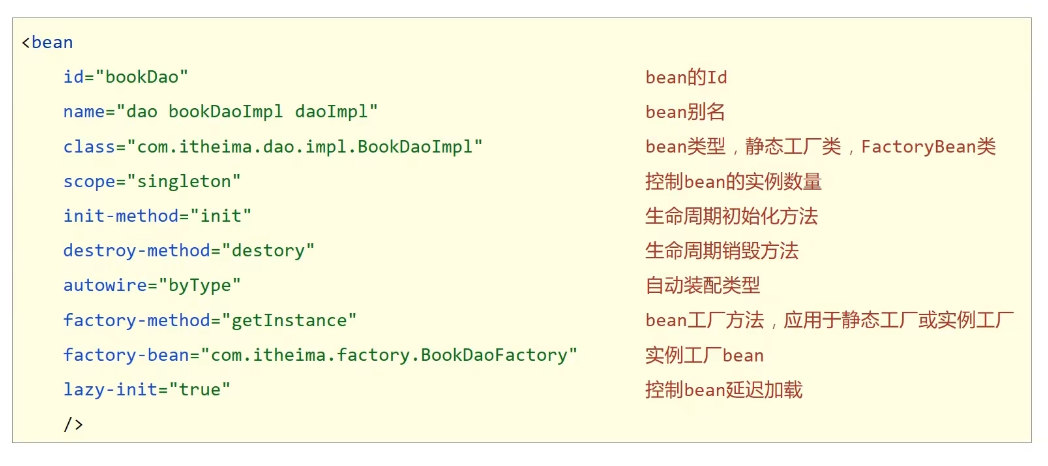
依赖注入相关总结
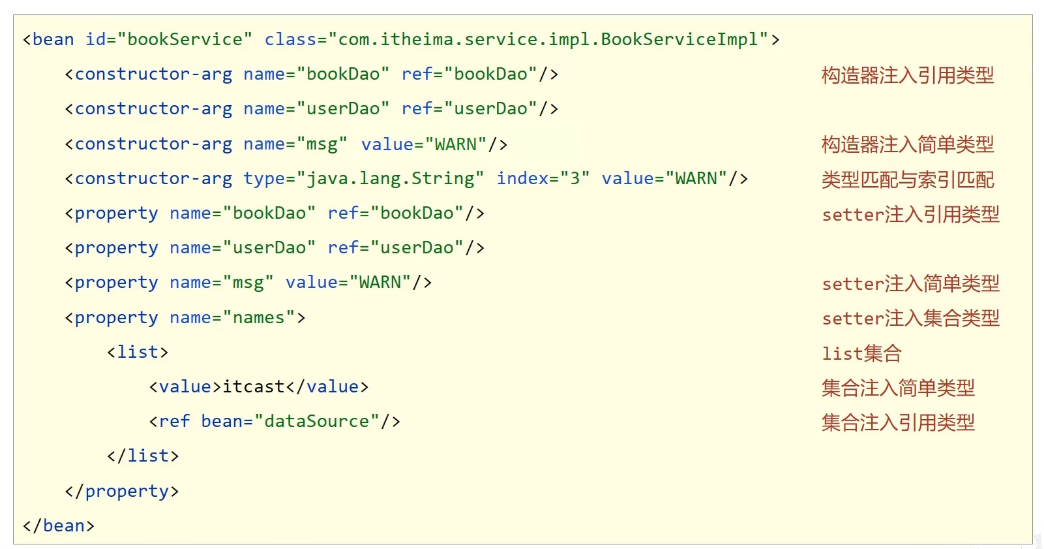
注解开发
注解开发定义bean
@Component
在类前,加注解指定名称/id

@Component("user")

在配置文件中,扫描文件夹中的类,子类

<context:component-scan base-package="com.opn">
@Controller
@Service
@Repository
纯注解开发
Spring3.0升级了纯注解开发模式,使用]ava类替代配置文件,开启了Spring快速开发赛道
使用Java类代替Spring核心配置文件
@Configuration注解用于设定当前类为配置类
@ComponentScan注解用于设定扫描路径,此注解只能添加一次,多个数据用数组格式
//配置类

@Configuration
@ComponentScan("com.opn")
public class SpringConfig {
}
从读取配置文件—> 读取配置类
//实现

ApplicationContext ctx = new AnnotationConfigApplicationContext(SpringConfig.class)
bean管理
单例模式
@Scope("singleton")
非单例模式
@Scpoe("prototype")
生命周期
构造方法后—构造方法
@PostConstruct
public void init()  {
}
销毁前—销毁构造方法
@PreDestroy
public void destory() {
}
依赖注入
自动装配
默认按照类型装配,类内仅仅存在一个关系
写在类中
@Autowired
@Autowired
private User user;
指定对应bean的名称
@Qualifier
@Autowired
@Qualifier("UserService")
private User user;
@Qualifier注解无法单独使用,必须配合@Autowired注解使用
简单类型注入
@Value()
@Value("909090")
private String username;
加载外部properties文件
@PropertySource(“jdbc.properties”)
jdbc.properties

username=this_is_username

配置类

@Configuration
@ComponentScan("com.opn")
@PropertySource("jdbc.properties")
public class SpringConfig {
}

bean类

@Value("${username}")
private String username;
第三方bean管理
@Bean
https://www.bilibili.com/video/BV1Fi4y1S7ix/?p=25
https://www.bilibili.com/video/BV1Fi4y1S7ix/?p=26
新创建独立 JdbcConfig 配置类
- 方式一:导入式
将独立的配置类导入核心配置
public class JdbcConfig {

    @Bean
    public DataSource dataSource(){
        DruidDataSource ds = new DruidDataSource();
        ds.setDriverClassName(driver);
        ds.setUrl(url);
        ds.setUsername(username);
        ds.setPassword(password);
        return ds;
    }
}

使用@Import注解手动加入配置类到核心配置,此注解只能添加一次,多个数据使用数组形式

@Configuration
@Import(JdbcConfig.class)
public class SpringConfig{

}
- 方式二:扫描式
直接将独立配置类加入核心配置
@Configuration
public class JdbcConfig {

    @Bean
    public DataSource dataSource(){
        DruidDataSource ds = new DruidDataSource();
        ...
        return ds;
    }
}

使用@ComponentScan注解扫描配置类所在包,加载对应的配置信息

@Configuration
@ComponentScan({"com.opn.config","",""})
public class SpringConfig{

}
第三方bean管理 - 注入
简单类型
@Value(“username”)
private String username;引用类型
给个形参
引用类型注入只需要为bean定义方法设置形参即可,容器会根据类型自动装配对象
    @Bean
    public DataSource dataSource(User user){
        sout(user);
    }
注解开发总结
xml配置和注解配置

Spring整合MyBatis
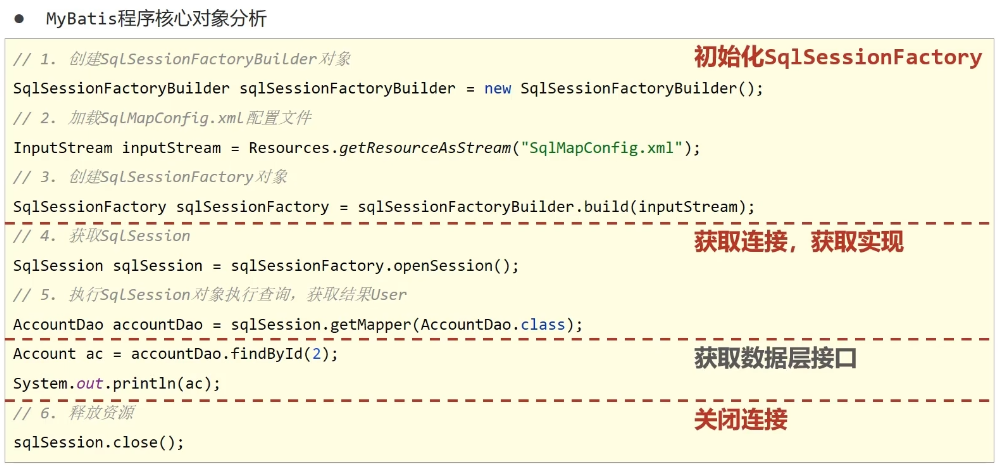
MyBatis基础流程
//1、创建SqlSessionFactoryBuilder对象
SqlSessionFactoryBuilder sqlSessionFactoryBuilder = new SqlSessionFactoryBuilder();

//2、加载SqlMapConfig.xml配置文件
InputStream inputStream = Resources.getResourceAsStream("SqlMapConfig.xml");

//3、创建SqlSessionFactory对象
SqlSessionFactory sqlSessionFactory = sqlSessionFactoryBuilder.build(inputStream);

//4、获取SqlSession
SqlSession sqlSession = sqlSessionFactory.openSession();

//5、执行SqlSession对象执行查询,获取结果User
User user = sqlSession.getMapper(User.class);

...

//6、释放资源
sqlSession.close();
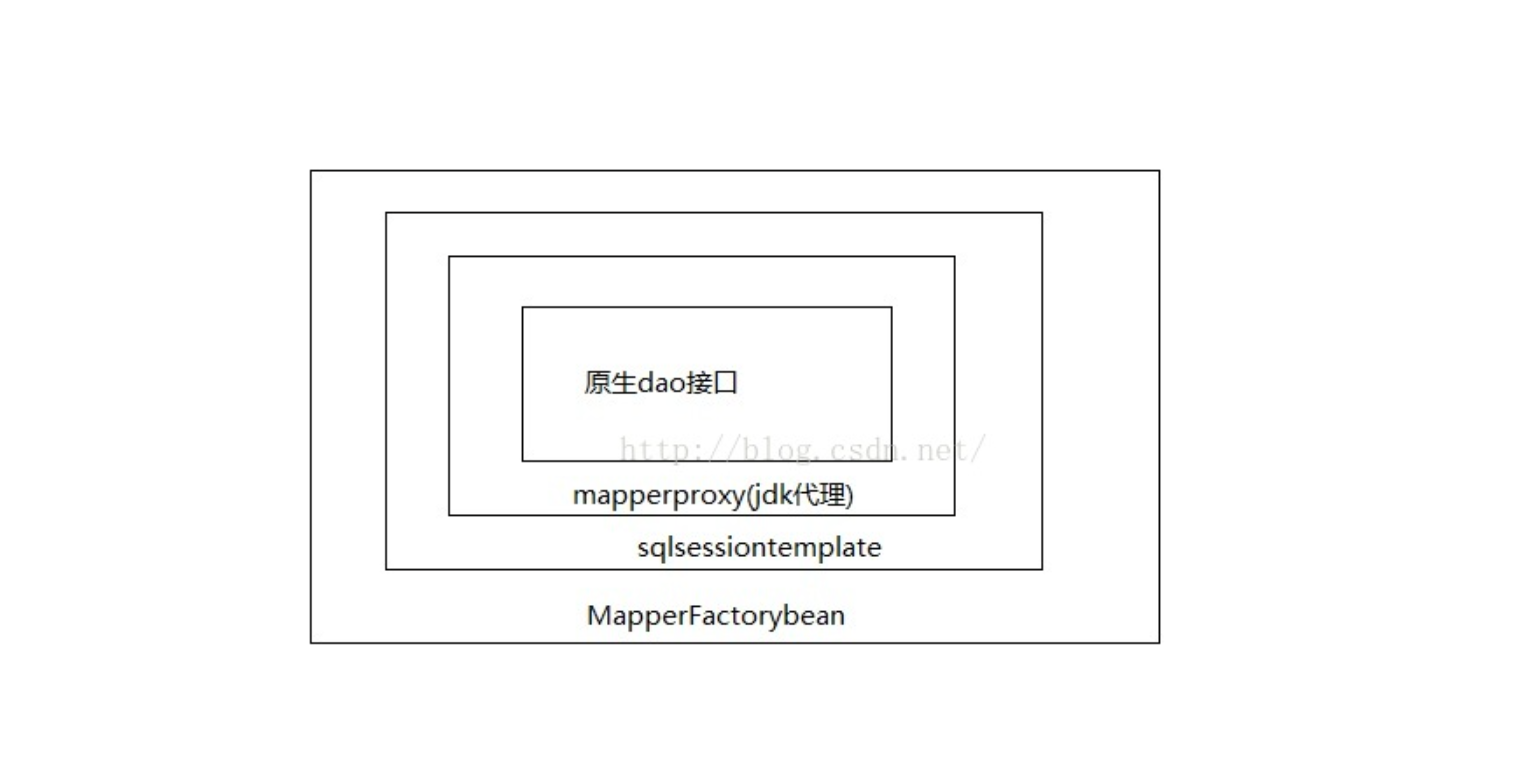
Spring+MyBatis注解 没有实现类
https://www.bbsmax.com/A/QW5YWKD9zm/
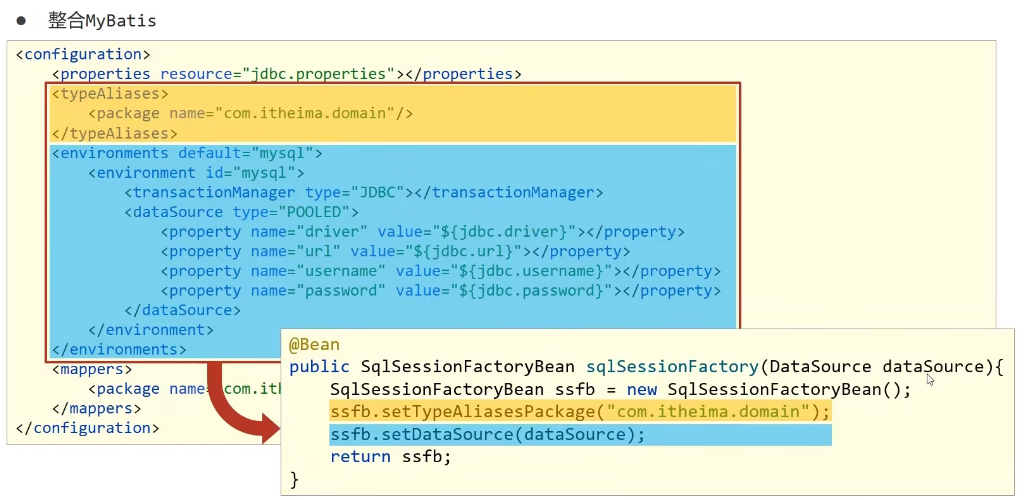
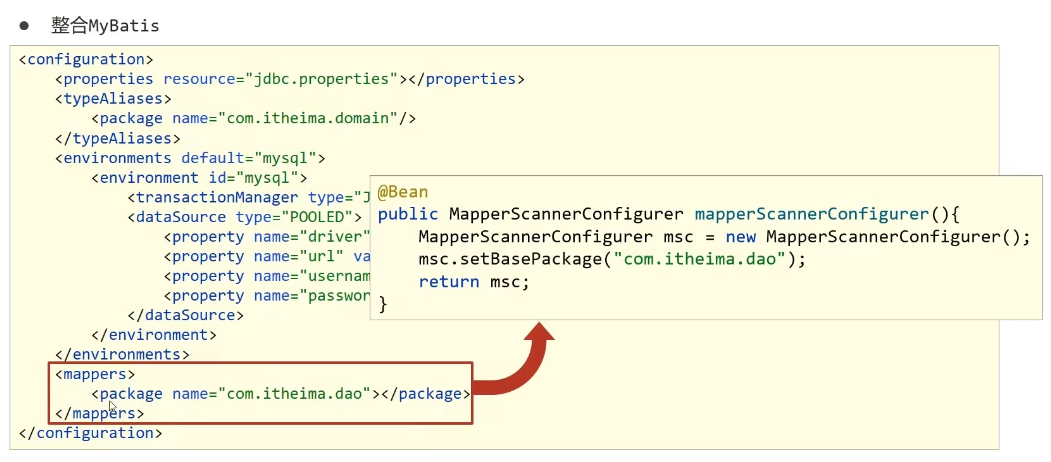
整合Druid,MyBatis
所用Maven
    <dependency>
        <groupId>org.mybatis</groupId>
        <artifactId>mybatis</artifactId>
        <version>3.5.5</version>
    </dependency>

    <dependency>
        <groupId>org.springframework</groupId>
        <artifactId>spring-jdbc</artifactId>
        <version>5.2.10.RELEASE</version>
    </dependency>

    <dependency>
        <groupId>org.mybatis</groupId>
        <artifactId>mybatis-spring</artifactId>
        <version>1.3.0</version>
    </dependency>
domain 数据表/bean
dao 数据访问层 使用注解形式自动配置
JdbcConfig bean
public class JdbcConfig {
    @Value("${jdbc.driver}")
    private String driver;

    @Value("${jdbc.url}")
    private String url;

    @Value("${jdbc.username}")
    private String username;

    @Value("${jdbc.password}")
    private String password;

    @Bean
    public DataSource dataSource(){
        DruidDataSource ds = new DruidDataSource();
        ds.setDriverClassName(driver);
        ds.setUrl(url);
        ds.setUsername(username);
        ds.setPassword(password);
           return ds;
    }
}
MyBatisConfig bean
public class MybatisConfig {

    @Bean
    public SqlSessionFactoryBean sqlSessionFactory(DataSource dataSource){
        SqlSessionFactoryBean ssfb = new SqlSessionFactoryBean();
        ssfb.setTypeAliasesPackage("com.opn.domain");
        ssfb.setDataSource(dataSource);
        return ssfb;
    }

    @Bean
    public MapperScannerConfigurer mapperScannerConfigurer(){
        MapperScannerConfigurer msc = new MapperScannerConfigurer();
        msc.setBasePackage("com.opn.mapper");
        return msc;
    }
}
使用/实现类
public static void main(String[] args) {

    ApplicationContext ctx = new AnnotationConfigApplicationContext(SpringConfig.class);

    UserService userService = ctx.getBean(UserService.class);

    User user = userService.findByName("111");\

    System.out.println(user);
}
整合JUnit
测试
https://www.bilibili.com/video/BV1Fi4y1S7ix?p=30
AOP
简介
OOP
Object Oriented Programming
面向对象编程
AOP
Aspect Oriented Programming
面向切面编程
一种编程范式,指导开发者如何组织程序结构
- 作用: 在不惊动原始设计/不改变原始代码的基础上,进行功能增强
Spring理念—无入侵式/无侵入式
AOP核心概念
连接点、切入点、通知、切面、通知类
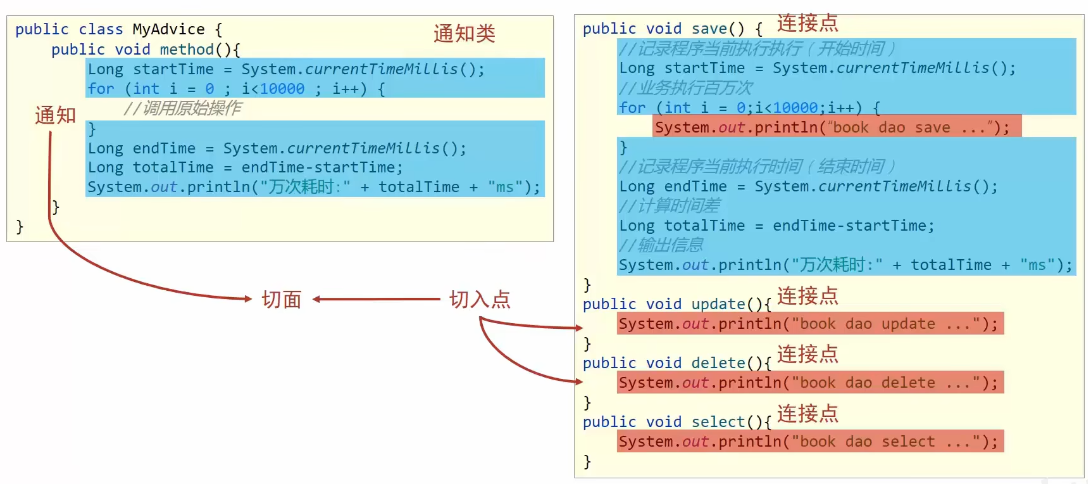
- 连接点 ( JoinPoint ):程序执行过程中的任意位置,粒度为执行方法、抛出异常、设置变量等
在SpringAOP中,理解为方法的执行
- 切入点( Pointcut ) :匹配连接点的式子
在SpringAoP中,一个切入点可以只描述一个具体方法,也可以匹配多个方法
- 通知( Advice ):在切入点处执行的操作,也就是共性功能
在SpringAOP中,功能最终以方法的形式呈现
- 通知类:定义通知的类
- 切面( Aspect )︰描述通知与切入点的对应关系
见解:
连接点—所有的方法
切入点—执行通知的方法
通知—在切入点处执行的操作,包含共性语句的方法
通知类—定义通知方法的类
切面—配置通知和切入点的关系
AOP入门案例
导入坐标
制造连接点方法(原始操作,Dao接口,实现类)
制造共性功能(通知类和通知)
定义切入点
切入点定义依托一个不具有实际意义的方法进行,即无参数,无返回值,方法体无实际逻辑绑定切入点和通知关系,并指定通知添加到原始连接点的具体执行位置
@Aspect 定义通知类受Spring容器管理,并定义当前类为切面类
@EnableAspectJAutoProxy 开启spring对AOP注解驱动支持
pom.xml
导入springframework自动导入aop相关包
<dependency>
  <groupId>org.springframework</groupId>
  <artifactId>spring-context</artifactId>
  <version>5.2.10.RELEASE</version>
</dependency>

<dependency>
  <groupId>org.aspectj</groupId>
  <artifactId>aspectjweaver</artifactId>
  <version>1.9.4</version>
</dependency>
接口、实现类
public interface dao {
    void save();
    void update();
}

@Component()
public class daoimpl implements dao {

    public void save() {
        System.out.println("Start this is AOP ~~~~~~~~~~ ");
        System.out.println("dao save");
    }

    public void update() {
        System.out.println("dao update");
    }
}
共性功能(通知和通知类)
@Component — Spring bean
@Aspect — 当AOP处理
定义切入点:
切入点定义依托一个不具有实际意义的方法进行,即无参数,无返回值,方法体无实际逻辑
@Component
@Aspect
public class MyAdvice {

    //定义切入点和共性功能

    @Pointcut("execution(void com.opn.dao.dao.update())")
    private void pp(){}

    //@Before告知在切入点前执行共性方法

    @Before("pp()")
    public void method(){
        System.out.println("Start this is AOP ~~~~~~~~~~ ");
    }
}
配置类
@EnableAspectJAutoProxy — 启动配置中的@Aspect
告知Spring存在AOP编程
@Configuration
@ComponentScan("com.opn")
@EnableAspectJAutoProxy
public class SpringConfig {
}
实现
    public static void main(String[] args) {
    ApplicationContext ctx = new AnnotationConfigApplicationContext(SpringConfig.class);

    dao ddd =  ctx.getBean(dao.class);

    ddd.save();

    ddd.update();
    }
结果
Start this is AOP ~~~~~~~~~~
dao save
Start this is AOP ~~~~~~~~~~
dao update
AOP入门案例 — 编写的代码/实际进行的操作
- 编写通知类
- 在Spring配置类添加@EnableAspectJAutoProxy注解
通知类
定义切入点:
切入点定义依托一个不具有实际意义的方法进行,即无参数,无返回值,方法体无实际逻辑
@Component  //Spring bean处理
@Aspect        //Spring AOP操作
public class MyAdvice {            //定义通知类

    //定义切入点
    @Pointcut("execution(void com.opn.dao.dao.update())")
    private void pp(){}

    //定义共性方法,绑定切入点和共性功能
    //@Before告知在切入点前执行共性方法

    @Before("pp()")
    public void method(){
        System.out.println("Start this is AOP ~~~~~~~~~~ ");
    }
}
Spring配置类
@Configuration
@ComponentScan("com.opn")
@EnableAspectJAutoProxy
public class SpringConfig {
}
AOP工作流程
- Spring容器启动
- 读取所有切面配置中的切入点
- 初始化bean,判定bean对应的类中的方法是否匹配到任意切入点
匹配失败,创建对象
匹配成功,创建原始对象(目标对象)的代理对象 - 获取bean执行方法
获取bean,调用方法并执行,完成操作
获取的bean是代理对象时,根据代理对象的运行模式运行原始方法与增强的内容,完成操作
SpringAOP本质:代理模式
AOP核心概念
目标对象( Target ):原始功能去掉共性功能对应的类产生的对象,这种对象是无法直接完成最终工作的
代理( Proxy )∶目标对象无法直接完成工作,需要对其进行功能回填,通过原始对象的代理对象实现
AOP切入点表达式
切入点∶要进行增强的方法
切入点表达式︰要进行增强的方法的描述方式
语法格式
切入点表达式标准格式︰动作关键字(访问修饰符﹐返回值﹐包名.类/接口名.方法名(参数)异常名)
…
描述方式一:描述接口方法
执行com.opn.dao包下的Dao接口中的无参数update方法
execution(void com.opn.dao.Dao.update())
描述方式二:描述实现类方法
执行com.opn.dao.impl包下的DaoImpl类中的无参数update方法
execution(void com.opn.dao.impl.DaoImpl.update())
通配符
*︰单个独立的任意符号,可以独立出现,也可以作为前缀或者后缀的匹配符出现
必有一个参数
execution(void com.opn.dao.Dao.*())
..:多个连续的任意符号,可以独立出现,常用于简化包名与参数的书写
有或没有参数
execution(void com.opn..*(..))
+∶专用于匹配子类类型
…
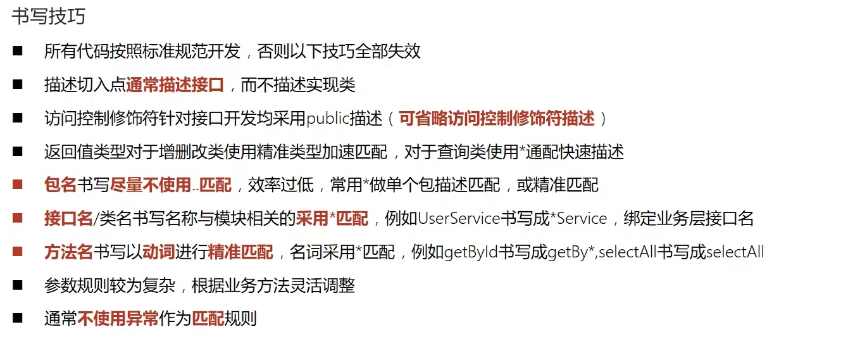
书写技巧
AOP通知类型
AOP通知描述了抽取的共性功能,根据共性功能抽取的位置不同,最终运行代码时要将其加入到合理的位置
前置通知
后置通知
环绕通知(重点)
返回后通知(了解)
抛出异常后通知(了解)
前置
@Before()
后置
@After()
环绕
@Around()
原始方法无返回值
@Around("pp()")
public void method(ProceedingJoinPoint pjp) throws Throwable {
    System.out.println("Start this is AOP ~~~~~~~~~~ ");

    //表示对原始操作的调用
    pjp.proceed();

    System.out.println("End this is AOP ~~~~~~~~~~ ");
}

原始方法有返回值
@Around("pp()")
public Object method(ProceedingJoinPoint pjp) throws Throwable {
    System.out.println("Start this is AOP ~~~~~~~~~~ ");

    //表示对原始操作的调用
    Object ret = pjp.proceed();

    System.out.println("End this is AOP ~~~~~~~~~~ ");

    //返回原始方法的返回对象
    return ret;
}
返回后通知/不抛出异常才通知
@AfterReturning()
抛出异常后通知
@AfterThrowing()
AOP通知获取数据
@Before()、@After()、@AfterReturning()、@AfterThrowing()
@Before("pp()")
public void method1(JoinPoint jp){
    Object[] args = jp.getArgs();
    System.out.println(Arrays.toString(args));
}
@Around
@Around("pp()")
public Object method(ProceedingJoinPoint pjp) throws Throwable {

    Object[] args = pjp.getArgs();
    System.out.println(Arrays.toString(args));

    //可在此处理数据
    //args[0]="...";

    Object ret = pjp.proceed(args);

    return ret;
}
AOP总结
概念:AOP(Aspect Oriented Programming)面向切面编程,一种编程范式
作用:在不惊动原始设计的基础上为方法进行功能增强
核心概念
代理、连接点、切入点、通知、切面、目标对象
切入点表达式
通知类型
环绕通知
环绕通知依赖形参ProceedingJoinPoint才能实现对原始方法的调用
环绕通知可以隔离原始方法的调用执行
环绕通知返回值设置为0bject类型
环绕通知中可以对原始方法调用过程中出现的异常进行处理
获取切入点方法的参数
JoinPoint
获取切入点方法返回值
获取切入点方法运行异常信息
事务
事务作用︰在数据层保障一系列的数据库操作同成功同失败
Spring事务作用∶在数据层或业务层保障一系列的数据库操作同成功同失败
PlatformTransactionManager 接口
DatasourceTransactionManager 实现类
案例 账户转账业务
1、在业务层接口上添加Spring事务管理
2、设置事务管理器
3、开启注解式事件驱动
1、在业务层接口上添加Spring事务管理
注解式事务可以添加到业务方法上表示当前方法开启事务,也可以添加到接口上表示当前接口所有方法开启事务
public interface AccountService {
    @Transactional
    public void transfer(String out,String in ,Integer money) ;
}
2、设置事务管理器
在JdbcConfig中
//配置事务管理器,mybatis使用的是jdbc事务
@Bean
public PlatformTransactionManager transactionManager(DataSource dataSource){
    DataSourceTransactionManager ptm = new DataSourceTransactionManager();
    ptm.setDataSource(dataSource);
    return ptm;
}
3、开启注解式事件驱动
@EnableTransactionManagement
Spring事务角色
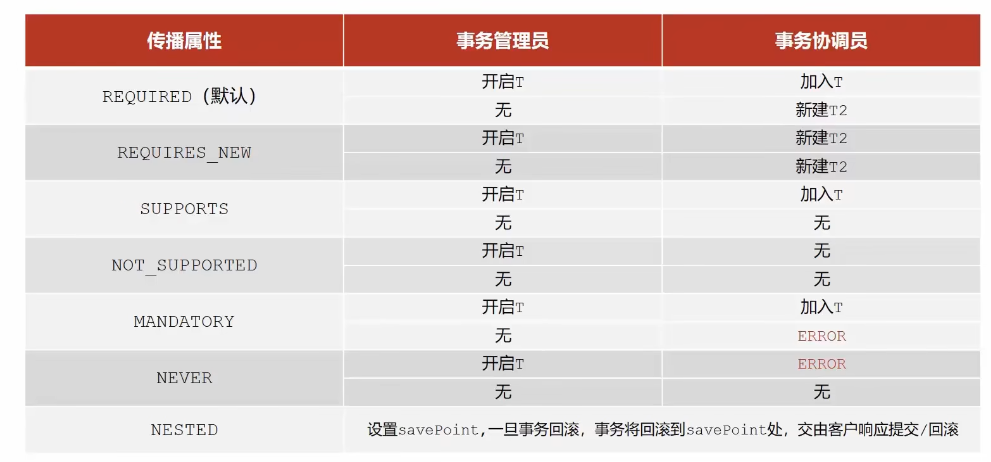
事务管理员:发起事务方,在Spring中通常指代业务层开启事务的方法
事务协调员︰加入事务方,在Spring中通常指代数据层方法,也可以是业务层方法
事务管理和JDBC用同一个datasource
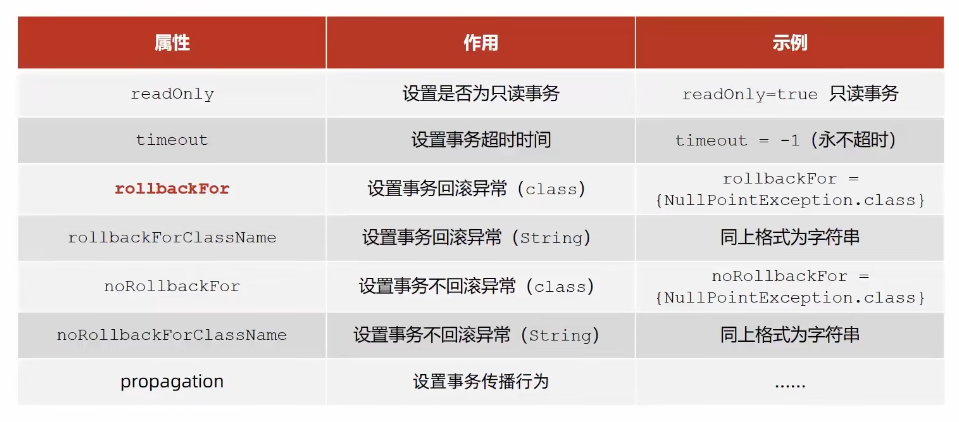
Spring事务属性
事务传播行为
本博客所有文章除特别声明外,均采用 CC BY-SA 4.0 协议 ,转载请注明出处!